October Pinterest Challenge-- Reversible Porch Sign for Fall and Winter
Welcome to the September Pinterest Challenge Blog Hop, hosted by My Pinterventures. The purpose of this Pinterest Challenge is to motivate all the participants of this hop (and you too) to not just pin, but to make it happen!
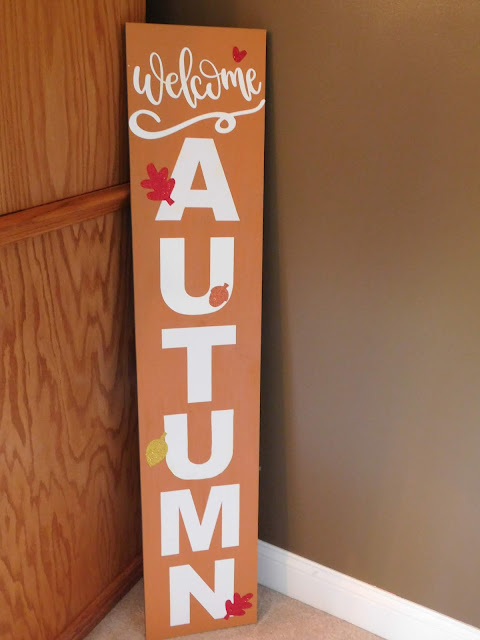
For this month's challenge I knew I wanted to make one of these large fall porch signs.

When I began looking through Pinterest I found some that were reversible for fall and winter and I liked that idea even better! So here's my take on it!

First I had my husband cut me a board that was 10" by 50" (an inch thick). I lightly sanded it and then brought it home to paint.
I painted one side a rusty orange by mixing two small bottles of paint together. I did two coats.


Once dry I flipped the board over and painted the other side blue.


Once I had my board all dry I brought it inside and began planning my design.
I finally settled on Welcome Autumn for the fall side and used this free SVG file; ungrouping it all until I was left with the word Welcome.
I then made it 9 1/2" inches wide and cut it out of white. I also used the scroll design that I had ungrouped and stretched it go be about 9 1/2" wide too; also cutting it out of white.

I typed the word Autumn into Cricut Maker using the Ariel Black font and made my letters 6" tall.
I then used my glitter HTV and cut out a few leaves of various fall colors; placing them around my sign until I had a design I liked.

I removed the leaves so I could iron on the letter and then went back and added in the leaves. Once cool I had a lovely new sign!

I then turned my attention to the back side. I found this great Let it Snow Free SVG file and used some snowflakes from an old Cricut cartridge I had on hand. I cut the letters out of white and used glitter HTV for the snowflakes.
Once I had my design laid out I used my iron to affix the decorations.

Then I put it out on the porch.


I just LOVE it!!

Linking Up With: Centerpiece Wednesday,


For this month's challenge I knew I wanted to make one of these large fall porch signs.
When I began looking through Pinterest I found some that were reversible for fall and winter and I liked that idea even better! So here's my take on it!

I painted one side a rusty orange by mixing two small bottles of paint together. I did two coats.


Once dry I flipped the board over and painted the other side blue.


Once I had my board all dry I brought it inside and began planning my design.
I finally settled on Welcome Autumn for the fall side and used this free SVG file; ungrouping it all until I was left with the word Welcome.
I then made it 9 1/2" inches wide and cut it out of white. I also used the scroll design that I had ungrouped and stretched it go be about 9 1/2" wide too; also cutting it out of white.

I typed the word Autumn into Cricut Maker using the Ariel Black font and made my letters 6" tall.
I then used my glitter HTV and cut out a few leaves of various fall colors; placing them around my sign until I had a design I liked.

I removed the leaves so I could iron on the letter and then went back and added in the leaves. Once cool I had a lovely new sign!


I then turned my attention to the back side. I found this great Let it Snow Free SVG file and used some snowflakes from an old Cricut cartridge I had on hand. I cut the letters out of white and used glitter HTV for the snowflakes.
Once I had my design laid out I used my iron to affix the decorations.

Then I put it out on the porch.


I just LOVE it!!

To join next month's #pinterestchallenge, click here to sign-up ⇒ November Pinterest Challenge
Now let's see what other things Pinterest inspired! Head over and visit the other hosts to see what they crafted, cooked, built, or tried! 
Erlene - My Pinterventures • Gail - Purple Hues and MeKristie - Teadoddles • Lynne - My Family ThymeJoanne - Our Unschooling Journey • Jenny - Cookies, Coffee and CraftsShirley - Intelligent Domestications • Debbee - Debbee's BuzzBeverly - Across The Boulevard • Julie - Sum of their Stories • Katrin - Kreativ KMichelle - Our Crafty Mom • Marie - The Inspiration VaultT'onna - Sew Crafty Crochet •Laurie - My Husband Has Too Many Hobbies • Alexandra - Eye Love Knots • Emily - Domestic Deadline • Leslie - Once Upon a Time & Happily Ever AfterRoseann - This Autoimmune Life • Toni - Girl, Just DIY • Lauren - Mom Home GuideDebra - Shoppe No.5 • Lydia - Lydia's Flexitarian KitchenSusan - Suzer Space • Habiba - Craftify My Love Terri- Our Good life


I absolutely LOVE it! You did a brilliant job!
ReplyDeleteThank you! I was so pleased with how it turned out too.
DeleteIt looks so festive!
ReplyDeleteThank you!
DeleteI love your sign, two sided is a great idea. More bang for the crafting buck. And the addition of the leaves and snowflakes really sets it off. This might be my pinterest inspiration project soon :)
ReplyDeleteAw, thank you! I love the addition of the leaves and snowflakes too; I felt like it needed that extra color to pull it all together.
DeleteI never knew you could use an iron to attach letters and graphics to wood! Love that you can use it for two seasons.
ReplyDeleteI wasn't sure it would work either but I read a few "how to" posts and found that it worked great.
DeleteLove that it is reversible - longer use time! And I never thought about using HTV on wood! Such a great idea!
ReplyDeleteI found that regular sticky backed vinyl kept peeling right back off so I thought I'd give HTV a try. It worked beautifully!
DeleteYour sign looks great! Making it two sided is such a good idea. I didn't know about using an iron to attach letters, either. Thanks for the tip.
ReplyDeleteThank you! I just love it.
DeleteI love this sign, and it is even better since it is reversible. I didn't know about the ironing trick. I will keep it in mind if I ever get a Cricut.
ReplyDeleteThank you!
DeleteGreat signs! I love reversible decor! I really like the leaves and the snow flakes. I need something like this for my tiny front door area. 😁
ReplyDeleteThanks. It was really simple to make.
DeleteI'm so honored you used my sign for inspiration. I'm so happy! Your porch signs look beautiful. I love reversible decorations. I'm working on a Christmas one now.
ReplyDeleteI am so happy you are honored.
DeleteIt's so cool to make and have reversible signs! And these look awesome! They really come in handy for the different seasons!
ReplyDeleteThank you! I am already thinking I need to come up with a spring/ summer one.
DeleteI love the multi purposeness (real word!) of reversible signs. I also love that you say Autumn on your sign. As a Brit I appreciate that!
ReplyDeleteLol! Thank you so much; autumn is such a pretty word.
DeleteYour boards turned out gorgeous! Thanks so much for sharing at Party in Your PJs link party!
ReplyDeleteThank you! I was so pleased with them.
DeleteWow! Great job! Clever to use an iron on adhesive for this project. Pinning to share with my daughter who loves to make things like this.
ReplyDeleteI was finding that the regular adhesive backed vinyl wasn't sticking well so I figured HTV to the rescue!
DeleteBy golly, I think I could do this! Your directions are clear and your photos are great. So precious. I am a snowbird and love snow. Which we see very little of here in west Texas. Love the addition of the snowflakes to the winter side of your board. Just darling.
ReplyDeleteI bet you could; thanks so much for the compliment. I am actually not a big fan of snow. I like the first storm and the initial white covering but living in New England my whole life I feel like I've seen enough. We've had super cold temps last night and I was reminded that winter is coming soon.
DeleteI am in love with the winter side of your board and I bet it will look quite a stunner as it is matchy match with your front door. Great Project!
ReplyDeleteThank you! I didn't even plan on the matchy match with my front door but it did work out perfectly for that.
DeleteIt’s lovely (and I love your blue door too). Thank you for sharing at The Really Crafty Link Party. Pinned.
ReplyDeleteThank you!
DeleteVery pretty and seasonal. I like that it has a use for two seasons.
ReplyDeleteThank you!
DeleteLove this idea! I have seen lots of signs like this in the last couple years - genius idea! I don't have a cutting machine, but I have been thinking about hand painting the words on the wood. The real challenge is getting a piece of wood home to have cut by my father in law - I have a small car.
ReplyDeleteAlexandra
EyeLoveKnots.com
Most stores like Lowe's, Home Depot, etc. will cut the wood for you right there in the store if you know what size(s) you want. Then you'd have a few smaller pieces to fit.
DeleteSuper cute idea. I love that it is two sided! Less to store and more to enjoy! #trafficjamweekend
DeleteExactly!
DeleteI came over from your current post to check out this sign as i uncovered and I truly mean uncovered some boards in our storage room when I cleaned it out and organized it that i could use to make a smaller version of this!! Thanks so much for the inspiration!!!
ReplyDeleteHugs,
Deb
You're welcome!
Delete