How to Make a Welcome Mat for Spring Using the Cricut
February's Pinterest Challenge is all about spring. I had bought a plain doormat at Christmas time hoping to transform it into a personalized gift for some friends of ours but I ran out of time. I decided this challenge was the perfect time to break that out and make a spring inspired welcome mat.

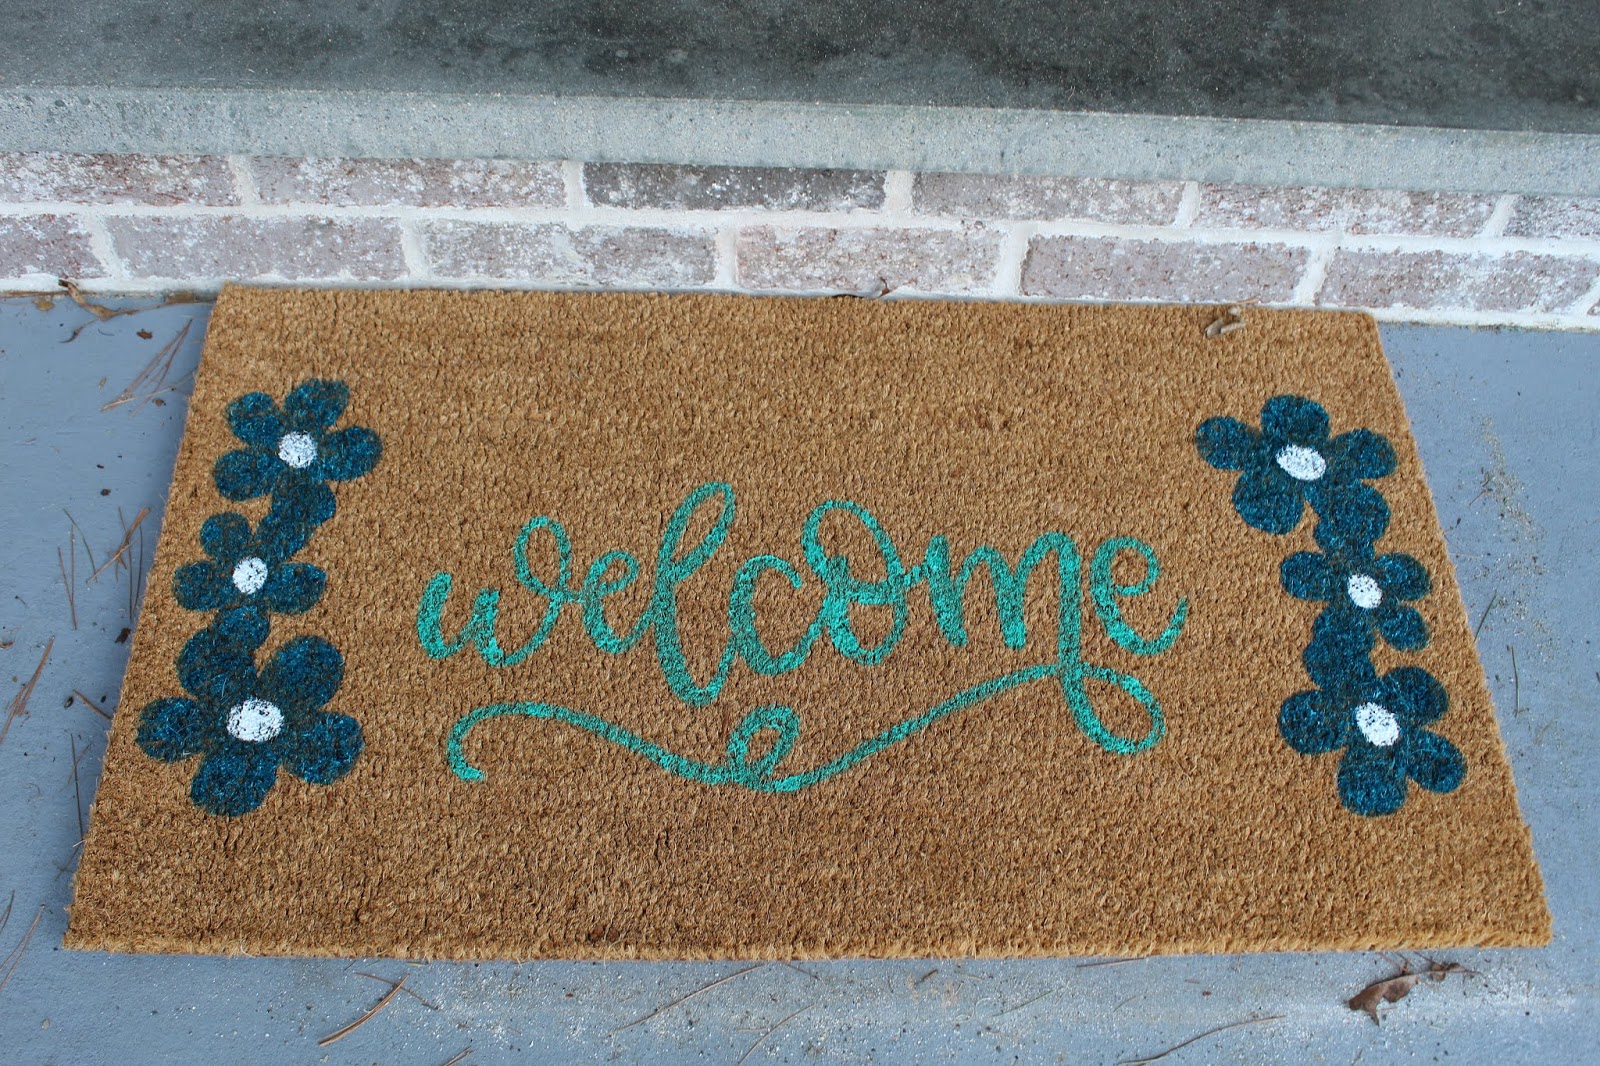
I found this adorable Lemon doormat for summer that just simply said Welcome with a few large lemons. I like the look of that and knew I just wanted to swap out the lemons for some nice large flowers in shades of blue and green.
I first found a cluster of flowers I like and cut them out of some heavy duty cardstock using my Cricut. I placed the flower clusters at each end (using both the image and the negative to get a better feel for how much space would be left in the middle-- by the time the rug is done I will have used them ALL) making sure I was going to like how they look.

Then I cut a second stenicl and taped the negative into place as best I could and used a stiff brush and some outdoor acrylic paint to paint in my flowers. I made sure to brush from the paper stencil onto my mat making sure my brush and paint did not go under the edge of the stencil. I did have to use my hand to hold a few of the detail down and I got a little bit of paint on my hands but that's always to be expected since I can be a messy crafter.

As soon as I was done painting I peeled up the stencil and set the rug aside to dry.


The next morning I took the actual flower stencils I still had left and place it over my painted flowers; lining up the edges before taping them down and painting in the centers. I was pleasantly surprised by how well the white paint showed up on the teal.


I taped the sheets together and to the rug as best I could before painting carefully. I was so afraid paint was going to seep underneath since I didn't have a good seal.. but thankfully it didn't!


After setting it aside to dry I decided to try it in place with the floral wreath I had made last year. I just love it!

TO JOIN NEXT MONTH’S #PINTERESTCHALLENGE, CLICK HERE TO SIGN-UP ⇒ March Pinterest Challenge

My Pinterventures • Domestic Deadline • Across the Boulevard
Cookies Coffee and Crafts • Farm Girl Reformed • Slices of Life
Decorate and More with Tip • Mom Home Guide • Purple Hues and Me
Intelligent Domestications • Sew Crafty Crochet • Life Beyond KitchenModern on Monticello • Sum of their Stories
Love My Little Cottage • EyeLoveKnots
Create with Cynthia • This Autoimmune Life
Now, let's see what the other hosts have created ⇓⇓
Linking Up With: Home Matters, Morning Cup of Joe,


The doormat looks great with your wreath and the mat looks so good. I've been wanting to make a welcome rug and yours is a great tutorial to follow.
ReplyDeleteThank you!
DeleteI love this! It turned out so pretty. I would have been worried about paint bleed, too. It's good to see that it wasn't a problem.
ReplyDeleteI have used stencils a lot so I did know a few basic techniques but was so relieved to not have ruined it.
DeleteThat's pretty. So it's just outdoor acrylic paint? The colours are so vivid, I love it. And good to know it's not too hard to personalised a door mat like this.
ReplyDeleteYep! We bought a set of bright colors on Amazon last year and they are good for outdoor use.
DeleteSweet! Love the colors! I have problems with messy paint hands as well, so I sympathize with your stencil challenges. I can think of a couple things I'd like to see on a door mat.
ReplyDeleteThank you! I love the colors too.
DeleteI love your new mat. I really want to make one.
ReplyDeleteThanks!
DeleteOh this is too cute!! I didn't know outdoor acrylic paint existed but that's good to know!
ReplyDeleteYep, they have lots of options for outdoor paint.
DeleteYou are so creative and talented. I like the way the mat came out and it looks so nice on your front stoop. Thanks for the visit to my blog. Hope you have a nice week.
ReplyDeleteAw, thank you!
DeleteGreat mat, I recently made one using my cricut but used vinyl. I put it on the mat and heated it up with a hairdryer so it sticks great. And sprayed it with leak seal. Works brilliant.
ReplyDeleteI did see that as an option too but I am still more comfortable working with paper than with vinyl on my Cricut.
DeleteI love how your craft turned out! Very cute and pretty! Pinned!
ReplyDeleteThank you!
DeleteLove how your mat turned out. By DIYing it, you did a great job of matching it to your door decor. Great idea and it's a new one to me. I have a new mat just like this one so guess what I am planning to do now!
ReplyDeleteThank you! So glad I could inspire you.
DeleteThis is a great idea. I had never thought of styling my own mat before. Love it :) Thanks for linking up to The Wednesday Blog Hop.
ReplyDeleteThank you!
DeleteSuch a lovely greeting for your guests! Matches you door perfectly!
ReplyDeleteThank you! I hope they all notice it anyway.
DeleteLooks nice, I like it! Thanks so much for linking up with me at my #UnlimitedMonthlyLinkParty 9 where I comment on and share on social media if share option is available, open February 1 to 26. My themed party 11 for Handcrafted Jewelry is open February 15 to 25 if you have any appropriate posts.
ReplyDeleteThanks for sharing.
DeleteI have wanted to make a custom welcome mat for some time and just haven't gotten around to it. You make it look so easy. It turned out great.
ReplyDeleteAw, thank you. It actually wasn't as hard to do as I thought it was going to be.
DeleteLove that you made it to match your wreath. Great project to make use of a cut machine. Pinned.
ReplyDeleteThanks!
DeleteOh my goodness, this is so pretty! What a lovely project for your home, and such a beautiful way to welcome guests. Thank you for sharing the excellent step by step directions to help us make one of our own. I appreciate you being a part of the Hearth and Soul Link Party. Thank you!
ReplyDeleteThank you so much!
DeleteI love your welcome mat! And I think I am very close to being able to get a Cricut, so I look forward to trying projects like this!
ReplyDeleteOh, thank you so much!
DeleteI love the colors you chose and the design! I bet you saved a ton of money compared to the lemon one as it had a high ticket price. I'm visiting from Home Matters.
ReplyDeleteIt was definitely cheaper since the only thing I really purchased was the mat!
DeleteThis looks amazing! You've done a fab job. :)
ReplyDeleteThank you!
DeleteYou've inspired me to make a custom welcome mat! Thank you for sharing at Party In Your PJ's.
ReplyDeleteThat's great!
DeleteYour mat is very cute. I like the flowers and that the color matches your door. #MMBC
ReplyDeleteThank you! I love that they match so well too.
DeleteThat really is lovely and I love how it matches your door. #mmbc
ReplyDeleteThanks!!
DeleteGreat addition to your entry! Thanks so much for sharing on craft schooling Sunday and nice to "meet" you!
ReplyDeleteThank you!!
DeleteThis rug turned out so well! Coconut fiber rugs are my favorite for my porch, and it's hard to find them decorated the way I want sometimes. Good idea to DIY it! I need a CriCut.
ReplyDeleteThank you! Without a Cricut you can always look for a stencil you like.
DeleteVisiting again to say thanks so much for linking up with me at A Themed Linkup 45 for Spring Crafts and Décor. Shared again on social media.
ReplyDeleteThank you!
Delete