20 Christmas Ornament Crafts For kids
My boys and I have enjoyed making many ornaments together over the years. Each year we try a few new holiday crafting projects and while they don't always turn out exactly like we plan we have had a great time making memories together.
Today I thought I'd compile a list of the ornaments we've made together over the years.

1. Birdseed Ornaments-- We made two different types of birdseed ornaments. These were very easy. We found pine cones around the yard, hot glued a ribbon to the top for hanging and then smeared peanut butter all over them. Once every cranny was filled we rolled them in birdseed.

2. Snowball Ornaments-- These ornaments might not look like much in the picture but in the light the salt really sparkles! All we did was coat a clear ornament with school glue and roll the ornament in Epsom salts.

3. Grinch Ornaments-- We took plain green glass bulbs and used yellow finger paint to dot the eyes onto the Grinch. We used permanent marker to draw on eyebrows, noses and mouths. Once the yellow eyes were dry we used the back of a paint brush dipped in black paint to make the pupils.

4. Santa suit ornament-- We used plain red glass balls to make our Santa suit ornaments. We hot glued a black ribbon around the middle of the ball to be Santa's belt and used some Hodgepodge hardware bands from Stampin Up to make his belt buckle (though you can easily use soda can tabs).

5. Melted Bead ornaments-- for these ornaments we lined a baking sheet with foil and then set some metal cookie cutters on it. We filled the metal cookie cutters with a single layer of pony beads. We then melted the beads in a 350 degree oven for 30 minutes (keep them in until the ornaments are nice and flat). Once cooled they popped right out of the cookie cutter and we used a bit of sand paper to file off any rough edges. We used a hand drill to make holes and threaded some string through to hand them in the tree.

6. Borax crystal ornaments- We made these fun ornaments as part of a science experiment one year. The boys each picked a colorful pipe cleaner or two and twisted them into a fun shape; like this green wreath and this red and white candy cane. Then we followed the instructions on this website.

7. Paperclip Angels-- We brought these angel ornaments to one of our homeschool crafting days. We found a box of butterfly paper clips at Staples. We looped an 8" piece of ribbon in half, threaded a large bead for the angel's head onto the ribbon and then looped the ribbon through the middle of the butterfly clip. We then took our loop back over the bead and pulled tightly. All that was left was to add a button halo and another knot to hold everything in place. (You an find more detailed step by step instructions in the link).

8. Reindeer thumbprint ornaments-- These ornaments were super simple! We found small silver glass ornaments and had each boy press his thumb into brown paint then onto the ornament. Once dry we used the back of a paintbrush to make red nose dots and black eyes. The boys used paint markers to draw on antlers and we tied them to a tree using green ribbon.

9. Salt dough ornaments-- We don't have a particular salt dough recipe; I usually look one up online and mix up the dough ahead of time. I often roll out the dough, cut out the shapes, use a drinking straw to make hanging holes, and even bake them myself (though did need the boys hand prints to make our hand print Santa ornaments). The boys then use paint and glitter pens to decorate them.

10. Tealight snowmen-- We loved making these tealight snowmen. We found some battery operated tea lights at the dollar store. The boys used permanent markers to draw on the snowman's eyes and mouth. We used a low temp hot glue gun to glue on ear muffs using two pom poms and a small piece of chenille stem. The final step was to take a small piece of ribbon, fold it to look like a scarf, and hot glue it in place.

11. Yarn hats-- These were so simple to make! We cut toilet paper tubes into 1" circles and then cut 14" strips of yarn. We folded the yarn in half, threaded the loop through the tube and when we pulled the loop out the other side we folded it up and over our strings. As we pulled tight our loops covered the paper toilet tube and made the rim of our hat. Once we folded the yarn all the way around the outside of the tube we gathered up all the yarn string sticking out the top, tied them together and knotted it off making a cute little hat pom pom!

12. Snowmen faces-- We filled clear glass ornaments with fake plastic snow. We then used paint markers to paint on orange noses, pink cheeks and black coal eyes and mouths.

13. North Pole ornaments- I found some red Popsicle sticks and we used some small brushes and white paint to paint on some stripes (we did paint both sides allowing time for drying in between). We used some sticky foam sheets to cut out holly leaves and arrows. To make all three ornaments we cut out 12 holly leaves and 6 arrows. We also cut out 18 holly berries using red sticky foam sheets and a hole punch. We peeled the paper backing off and put our berries and leaves on our North Pole. We then attached the arrows and wrote North on one side and Pole on the other. We finished off the signs with a bit of glitter glue.

14. Ribbon/ beaded trees-- We used pony beads, chenille stems and ribbon to make these fun trees. I followed the instructions found here for marking the ribbon and then used my hole punch to punch holes in the ribbon. We threaded two beads onto the chenille stem and then bent the ends up to keep the beads from falling off. Then we followed the ribbon folding technique in the instructions substituting a pony bead for each pearl. We finished off our tree by bending the chenille stem and inserting an ornament hook. As you can see my boys enjoyed playing around with non- traditional colors.

15. Beaded candy canes- To make these ornaments we used red, green and white/clear tri- shaped beads (like these) and threaded them onto one long piece of chenille stem. We made sure to follow a pattern and to turn the beads slightly so they would interlock. We turned up the ends of the chenille stem to keep the beads from falling off and then bent them into the hook shape of the candy cane when we were done.

16. Pinecone reindeer-- These Cure reindeer were so easy to make! Rather than using found pine cones we opted to use some cinnamon scented ones from the craft store. We used the hot glue to add googlie eyes, a pom pom nose and two oval shaped brown felt swatches for the ears. We then used the glue to add a decorative ribbon to hand them from and twisted some brown chenille stems around the top of the pine cone to make the antlers.

17. Swirl painted ornaments- For these fun ornaments we dripped a few different colors of acrylic paint inside clear glass ornaments and swirled the balls around until all the sides were covered in paint. We let them air dry a day or two before hanging them on our tree.

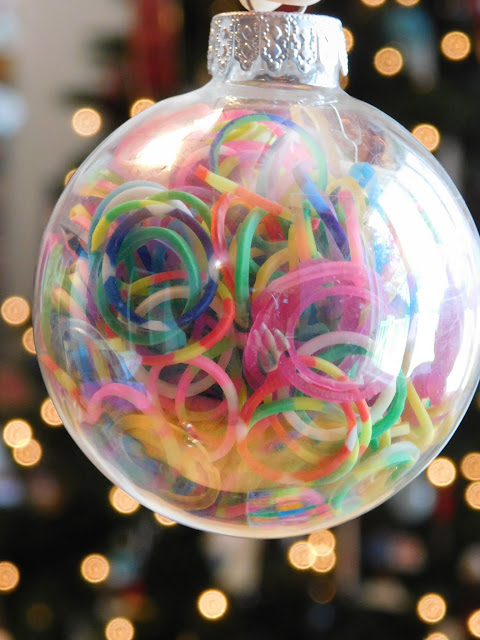
18. Loom band ornaments-- The simplest ornaments yet! We filled clear glass ornaments with leftover loom bands for a fun keepsake.
19. Keepsake memory ornaments-- Each boy picked his favorite color ornament and we wrote their names in gold and silver permanent markers on the front of the ornament and the year on the back. We then used black permanent markers to write down everything they wanted to remember about that year-- trips we took, skills they learned, and what type of birthday party they had.


Today I thought I'd compile a list of the ornaments we've made together over the years.

1. Birdseed Ornaments-- We made two different types of birdseed ornaments. These were very easy. We found pine cones around the yard, hot glued a ribbon to the top for hanging and then smeared peanut butter all over them. Once every cranny was filled we rolled them in birdseed.

4. Santa suit ornament-- We used plain red glass balls to make our Santa suit ornaments. We hot glued a black ribbon around the middle of the ball to be Santa's belt and used some Hodgepodge hardware bands from Stampin Up to make his belt buckle (though you can easily use soda can tabs).
6. Borax crystal ornaments- We made these fun ornaments as part of a science experiment one year. The boys each picked a colorful pipe cleaner or two and twisted them into a fun shape; like this green wreath and this red and white candy cane. Then we followed the instructions on this website.
9. Salt dough ornaments-- We don't have a particular salt dough recipe; I usually look one up online and mix up the dough ahead of time. I often roll out the dough, cut out the shapes, use a drinking straw to make hanging holes, and even bake them myself (though did need the boys hand prints to make our hand print Santa ornaments). The boys then use paint and glitter pens to decorate them.
10. Tealight snowmen-- We loved making these tealight snowmen. We found some battery operated tea lights at the dollar store. The boys used permanent markers to draw on the snowman's eyes and mouth. We used a low temp hot glue gun to glue on ear muffs using two pom poms and a small piece of chenille stem. The final step was to take a small piece of ribbon, fold it to look like a scarf, and hot glue it in place.
12. Snowmen faces-- We filled clear glass ornaments with fake plastic snow. We then used paint markers to paint on orange noses, pink cheeks and black coal eyes and mouths.
13. North Pole ornaments- I found some red Popsicle sticks and we used some small brushes and white paint to paint on some stripes (we did paint both sides allowing time for drying in between). We used some sticky foam sheets to cut out holly leaves and arrows. To make all three ornaments we cut out 12 holly leaves and 6 arrows. We also cut out 18 holly berries using red sticky foam sheets and a hole punch. We peeled the paper backing off and put our berries and leaves on our North Pole. We then attached the arrows and wrote North on one side and Pole on the other. We finished off the signs with a bit of glitter glue.
14. Ribbon/ beaded trees-- We used pony beads, chenille stems and ribbon to make these fun trees. I followed the instructions found here for marking the ribbon and then used my hole punch to punch holes in the ribbon. We threaded two beads onto the chenille stem and then bent the ends up to keep the beads from falling off. Then we followed the ribbon folding technique in the instructions substituting a pony bead for each pearl. We finished off our tree by bending the chenille stem and inserting an ornament hook. As you can see my boys enjoyed playing around with non- traditional colors.
16. Pinecone reindeer-- These Cure reindeer were so easy to make! Rather than using found pine cones we opted to use some cinnamon scented ones from the craft store. We used the hot glue to add googlie eyes, a pom pom nose and two oval shaped brown felt swatches for the ears. We then used the glue to add a decorative ribbon to hand them from and twisted some brown chenille stems around the top of the pine cone to make the antlers.
17. Swirl painted ornaments- For these fun ornaments we dripped a few different colors of acrylic paint inside clear glass ornaments and swirled the balls around until all the sides were covered in paint. We let them air dry a day or two before hanging them on our tree.
18. Loom band ornaments-- The simplest ornaments yet! We filled clear glass ornaments with leftover loom bands for a fun keepsake.
20. Candy cane ornament-- These ornaments were fun and simple too. Each child held two candy canes together and using candy cane duct tape they taped the tops and bottoms of the heart together. We looped a chenille step around the top of the heart for hanging and finished them off by tying on some small velvet bows.
They've all been lots of fun to make and while we often gift them off to family and friends we do keep a few for ourselves and it's a yearly reminder of seasons past.

Linking Up With:


My boys and I used to make ornaments. I boxed them up for them to take when they start families of their own. This post made me smile in remembering and wow have you done some beautiful ones and so much fun. The Grinch ornaments so cute! Have a Merry Monday!
ReplyDeleteThanks! My boys each have their own box of ornaments now and we do add to them each year both by making some and through our ornament tradition. They'll be all set when they move out!
DeleteThese are adorable :) I really like the grinch ones!
ReplyDeleteAw, thank you!
DeleteLove, love, love these ideas. Can't wait to try them with my grandson. I love the Santa baubles especially but so many ideas to try. Pinning. #mg Sue from Sizzling Towards Sixty & Beyond
ReplyDeleteThank you! Enjoy!
DeleteThese are so cute!
ReplyDeleteHow wonderful to have the memories associated with each.
I love the trees made of ribbon and beads and the paperclip angels. We'll have to try those!
They're lots of fun and perfect for no mess crafts!
DeleteThese are so cute! I love the Grinch ornaments! Thanks for sharing. I may try to make a few of these with my boys, for some Christmas gifts for the neighbors. Hope you and your family have a Merry Christmas :)
ReplyDeleteI hope you and your family have a Merry Christmas too. Glad I could give you some fun ideas.
Deletehow crafty! I like the keepsake ornament! I think that one is really unique
ReplyDelete#happynow
Thank you!
DeleteLove the Grinch and the Santa Belly Christmas decorations! These look fab, you have given us some inspiration x #DreamTeam
ReplyDeleteOh I am so glad! I love when I can inspire someone else.
DeleteWell now I feel really boring with our plain old store-bought ornaments. It looks like you have a tree filled perfectly with memories. The keepsake memory ornaments are definitely precious.
ReplyDeleteLOL! Many of our ornaments are store bought ones as well. In fact my boys often give away the ones they make to family and friends. I have to beg to get a few for our tree.
DeleteI love making tree ornaments with my two. We have a number of salt dough shapes with hand and finger prints in, and yesterday we made finger print snowmen onto red baubles. I love your paperclip angels and I think we might need to "borrow" your idea of making a memory ornament each year. That's such a brilliant way to look back over the year together. Thanks for sharing with #DreamTeam x
ReplyDeleteYou're welcome! "Borrow" any ideas you'd like!
DeleteIt will be so fun picking one of these ornaments to do with the grandkids! I love them all. Today though we are making cookies but there are many days left to have fun! Thanks for the ideas
ReplyDeleteSo true! Enjoy!
DeleteFun ideas! I especially love the painted swirl ornament. Pinning.
ReplyDeleteThanks for the pin! We LOVED our swirl painted ornaments; they are so colorful and can be changed to meet any color scheme.
DeleteGreat list of good ideas for little hands! Visiting from Reader Tip Tuesday party.
ReplyDeleteThank you!
DeleteHow to make a few of these and add a new ornament to the tree each year.
ReplyDeleteThat's what we end up doing.. I'm at the point where I need a second full size tree.
DeleteI love the swirl painted ornaments!!
ReplyDeleteThat was one of our favorites too. They were fun and the color combinations were endless.
DeleteThese are all such great ideas! I'm pinning it for when my daughter gets a little older! :)
ReplyDeleteThank you and thanks for the pin!
DeleteLove them!! My favs would be the birdseed and swirl painted!! Thanks so much for linking up at #AThemedLinkup 7 for Christmas Trees and Ornaments. Shared.
ReplyDeleteOur favorites were the swirl painted ornaments too.
Delete